21 Bit Protocol Scales
DPU-550 Cable Installation
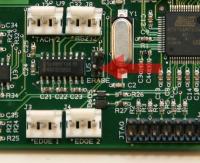
The iGaging scales need around 3V to operate. The DPU-550 and DRO-350 scale interfaces were designed to operate at either 5V for quadrature scales or at 1.5V for Chinese scales. Thankfully, the DPU-550 processor uses 3.3V so we can supply the scales with that through the scale voltage selection jumper. In order to do that, we must find a suitable location to solder a one pin header so that we can jumper the 3.3V over to the scale interface. Such a location can be found at the ERASE header at position J14. The bottom pin on this two pin header supplies 3.3V so solder the one pin header into the hole from the back side of the DPU-550 PCB.
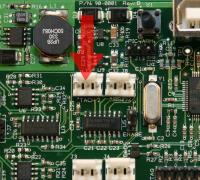
Now pick the scale input that you want to install the cable for. You can use any one of the five scale inputs you wish but keep in mind that scale inputs 1-3 on the DRO-350 share a single scale voltage header so you must use the same type of scale on all three scales. The scale voltage headers for scales 4 and 5 are independent so they are a better bet if you are using less than three iGaging scales. The instructions that follow will show the installation on scale 4 but the other scale inputs are the same except where noted.
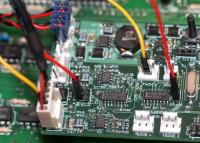
Remove the black jumper from the scale voltage header for the scale input you selected. Use the red jumper and connect one side to the one pin header you installed in the previous step and the other end to one of the LEFT two pins on the scale 4 or 5 voltage header on the DPU-550 OR to one of the RIGHT two pins on the shared scale voltage header on the DRO-350 (pins 2 or 4 on JP8). You can use the second, leftover pin on each header to daisy-chain to additional scale voltage headers if you want more than one iGaging scale on your system. Under any circumstance do not jumper onto the wrong two pins because that will short the power supplies together and bad things could happen.
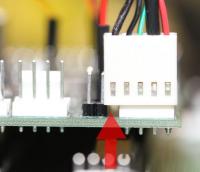
Now get the finished USB cable and install the five pin plug onto the four pin scale header. How do you install a five pin plug on a four pin header you ask? Easy, just hang the fifth pin with the cable shield over the side of the scale header. The cable shield is the black wire on one side of the plug. Take a look at the picture at left to confirm the orientation. Scale 5 might require some minor modification to the header J15 beside it and/or to the USB cable shroud since the two will interfere with each other.
You do not need the four pin header included in the scale cable kit so you can save it for other uses. Plug the yellow jumper you soldered to the USB scale cable and install it into the middle pin on the TACH 2 header at position J2 on the DPU-550. OpenDRO generates a clock signal that is appropriate for the iGaging scales and outputs it on the middle TACH 2 pin. Without this clock, the iGaging scales will not generate an output signal for the DRO to read. If you have a tachometer already on TACH 2, then you can move it to the Flex connector on the DRO-350 at position JP2 where it is referenced as TACH 1 in OpenDRO. Note that you must unselect TACH 2 from the setup of all machines in OpenDRO in order to enable the iGaging scale output.
 The final step is to install the USB side of the cable on the back panel of the DRO-350. Pick any location you like as long as it is without obstructions underneath it and is close enough for the cable to reach the scale input. Drill a 5/8" (16mm) hole and install the scale cable by securing it with the plastic nut. The rubber O-ring goes on the outside underneath the lip of the connector to provide a seal.


