DRO-375 PCB Construction
Step 1. Parts Inventory
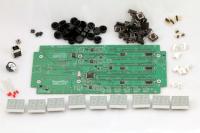
First, you should take inventory of the through hole parts to make sure that you have everything you need to finish the assembly. The table below lists the quantities and descriptions of the parts in clockwise order on the picture at left starting from the the DRO-375 printed circuit board (PCB). You can click on this or any other picture to get a larger view of it.
| Quantity |
Component |
| 1 | DRO-375 PCB |
| 9 | 7-segment LEDs |
| 5 | 3mm indicator LEDs |
| 1 | Piezo Buzzer |
| 1 | USB connector |
| 1 | 6mm tact switch |
| 3 | Shunt jumpers |
| 23 | Black tact switch caps |
| 23 | 12mm tact switches |
| 3 | 2x3 headers |
| 3 | 1x2 headers |
| 3 | 4-pin MTA headers |
| 4 | 3-pin MTA headers |
| 2 | 2-pin MTA headers |
You will also need some tools and supplies to finish assembling the circuit board. These supplies include:
- Soldering Iron - Just about any soldering iron will do but make sure it has a fairly fine point.
- Solder - 63/37 or 60/40 flux core solder with a diameter between 0.015" and 0.030" is best. You can use lead free solder but it is more difficult to work with. You can also use larger diameter solder in a pinch but it is harder to control the amount of solder applied with larger diameters.
- Solder Wick - We all make mistakes and you'll want to have some of this handy stuff available when your soldering goes awry. Solder wick is a wire braid impregnated with flux that, when pressed against a solder connection with a soldering iron, wicks the solder up into braid. It is invaluable for desoldering a bad connection or removing excess solder.
- Antistatic Wrist Strap - Since we are working with static sensitive components, you should wear an antistatic wrist strap at all times while handling the boards and components. You should also try to work in a non-carpeted area that is as free from static as possible.
- Flux - This is not strictly needed since solder already contains flux, but it is sometimes handy to apply extra flux directly to a stubborn or dirty connection. Rosin flux is the most popular type but there are a variety of other formulations available including "no clean" types. If you get too much flux on the board, it is best to clean it off with a Q-tip dipped in rubbing alcohol because some types of flux can be corrosive.
- Magnifying Glass - Let's face it, modern electronic components are small and can be difficult to see with the naked eye. A magnifying glass will not only help you inspect your soldering work, but it will also help when we visually inspect the board.
- Multimeter - You will need a multimeter for testing and troubleshooting the board. Just about any multimeter will do and you will only need the DC voltage and resistance measurements.

