DPU-550 Construction
Step 8. Reassemble the DRO-350
 We are on the home stretch now and it is time to put all of the pieces back together. Start by reattaching the external scale connectors on the rear panel back to the DRO-350 PCB in the same places you removed them. Next, reattach the AUX connector back to the JP2 Aux position.
The RS-232 connector is no longer needed for programming the PIC so you can reuse it for the DPU-550 RS-232 port if one is included on your DPU-550. If not, then you can either remove it or just leave it as is and skip ahead. To use the RS-232 connector with the DPU-550, remove all of the wires from the RS-232 connector except for the ones on pins 3 and 5. Clip off the 5-pin MTA connector. Solder a wire to pin 2 on the RS-232 connector. Attach a 3-pin MTA connector using the connections shown on the table. Note that pin 1 on the MTA connector is on the left when the wires are pointed down. After you make the cable, you can plug it into position J8 on the DPU-550 PCB.
| Signal | RS-232 Pin | MTA Pin |
| Transmit | 2 | 1 |
| Receive | 3 | 2 |
| Ground | 5 | 3 |
If your DPU-550 includes a 5V power supply, then there is a special consideration for powering the DPU-550 so read Step 8b below. If not, then plug the power connector from the rear panel into position JP6 on the DRO-350 PCB.
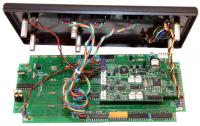
Now that all of the external connectors are reattached, you can lay the DRO-350 PCB back on top of the six standoffs on the rear panel and attach it with the six phillips head screws. As before with assembling the DRO-350, be careful not to use too much torque to avoid stripping the plastic where the standoffs attach to the rear panel.
Secure the front panel with the four phillips head screws and we are done with construction. We are now ready to install the OpenDRO software.
Step 8b. 5V Power Supply Connection
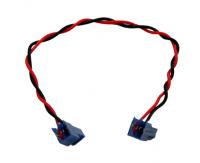
 The 5V power supply is composed of the large components in the upper left-hand corner of the DPU-550 PCB. If they are not populated on the PCB, then you do not need to read further. If they are, then you should connect the power cable from the rear panel to the IN header of the DPU-550 (J11, the second two pin header from the top) instead of the JP6 header on the DRO-350 PCB. Use a power jumper cable between the OUT port of the DPU-550 (J12, the top two pin header) and the Power JP6 header on the DRO-350 PCB. If you did not purchase a power jumper cable, then you can make one by taking two 5" pieces of different color wire and connecting two 2-pin MTA connectors between them. The photo shows the orientation of the two colored wires.
